
650Vue Part 6: Segmented Registral Displays
In the previous section, we saw how the values of the 6502's registers are maintained in the Vuex store. The next step is to display these registers in the browser. It would have been trivially easy to print out the register values as plain text, but there's no reason not to incorporate my fancy segmented digits into the display right from the beginning.

We can create a component called Segment which is responsible for taking a value from
the store and rendering the appropriate simulated-LED digits in the browser. The AC, XR, YR, and
SP registers are all single-byte values. In hexadecimal, that means the values can range from
00 to ff. We always represent a byte as a two-digit hexadecimal number.
Half a byte, representing a single hex digit, is sometimes referred to as a nybble, but I
prefer to think of half a byte as a digit in this context.
The PC register is special—it expresses a two-byte value, called a word. A word is always written as a 4-digit number in hexadecimal. Reading from left to right, the first two digits are referred to as the high byte, with the final two digits making up the low byte.
So let's look at some of the code that accomplishes the segmented display. I'm not going to include all the code details here; if you want to see the full commit, you can look at the GitHub commit that adds the segmented display for status registers. Just be aware that the final version of the code may contain improvements that are not yet present in earlier commits. As I've said before, the development process is often messy.
The first step was to add PNG files for each of the hexadecimal digits and place them in the
/src/assets directory. The files are named digit_0.png,
digit_1.png, and so on, all the way up to digit_f.png—sixteen
files in all, one for each hex digit.
The guts of the Segment component are shown below (Figure 2):
export default {
  props: {
    value: {
      type: Number,
      default: 0
    },
    size: {
      type: String,
      default: 'byte'
    }
  },
  computed: {
    hex() {
      return this.value.toString(16).padStart(4, '0');
    }
  }
}
The Segment component has two properties: value is the value to display, and
type indicates whether the value is a byte or a word. A computed property,
hex(), converts value into a 4-digit string of hexadecimal, padded with
leading zeros.
There's no need to have separate hex conversions for bytes and words; we can always work with
4-digit values and only show as many digits as we need. If we have a two-digit number like c4,
then to write it in four digits, we'd pad the high byte with leading zeros like this: 00c4.
If we're displaying a two-digit number, we can ignore the leading zeros and only show the two digits that
represent the low byte. We only need to show the high byte if we're displaying a full 4-digit word. The view
code is shown in Figure 3:
<template>
  <span>
    <span v-if="this.size === 'word'">
      <img :src="require(`@/assets/digit_${hex[0]}.png`)">
      <img :src="require(`@/assets/digit_${hex[1]}.png`)">
    </span>
    <span>
      <img :src="require(`@/assets/digit_${hex[2]}.png`)">
      <img :src="require(`@/assets/digit_${hex[3]}.png`)">
    </span>
  </span>
</template>
The template in Figure 3 will only show the two digits of the high byte if the size
prop is "word", and will always show the two digits of the low byte. The <span>
tags for each set of digits are wrapped in an outer <span> tag. In normal HTML,
we would omit this outer span, but because Vue component templates must have a single root
element, we have to include it.
All that remains is to create a component that calls Segment with the values of
individual registers (Figure 4):
<template>
<div>
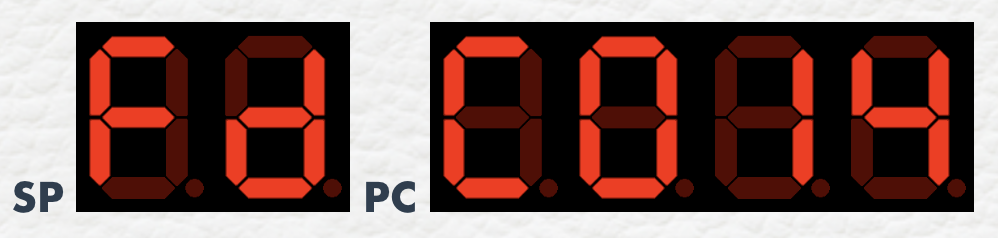
<b>SP</b> <Segment :value="cpu.sp" />
<b> PC</b> <Segment :value="cpu.pc" size='word' />
</div>
</template>
<script>
import Segment from '@/components/segment';
import { mapState } from 'vuex';
export default {
components: {
Segment
},
computed: {
...mapState(['cpu'])
}
}
</script>
The component in Figure 4 takes advantage of a slick feature in Vuex: mapState, which
allows you to define virtual getters for any of your store properties. In general, you should never
have to write a Vuex getter if you're simply retrieving a value from the store. If you find yourself
writing things like this.$store.getters.getRegister(pc) to get values out of your store,
then it's time to learn mapState's more compact notation.
With everything laid out as above, the component in Figure 4 should display something like the following:
In the next section, we'll look at implementing the Status Register (SR) display as a series of eight individual lights.